 |
|
| 1.INTRODUCTION |
|
ResAvenue offers e-hoteliers’
a one-stop solution for property and inventory
management along with real time online booking
engine along with real time e-transactions processing
all under one roof.
At ResAvenue we strive to offer value added services
to the e-merchant to easily manage room inventory,
room rates and agent networks as well as to increase
sales, improve value and overall profitability
and to enhance transaction security and pro-actively
counter fraud and charge-back related losses.
|
| 1.1
Overview And Objectives |
|
The ResAvenue System has been
designed for quick integration and ease of use.
The ResAvenue User Guide will introduce you to
the ResAvenue Hotel Reservation System and familiarize
you with the features and methods of integration
of ResAvenue Solution.
The ResAvenue User Guide is intended as a set
up guide for new registrants of ResAvenue.com.
It outlines the steps required to be followed
by a new registrant to bring their account from
newly created to completely integrated. This document
has been written assuming a basic level of familiarity
HTML and technical aspect of e-commerce. (If you
need to learn more about HTML basics please read
appendix A.) Reading this document should be the
first step a merchant takes after signing up for
their account. It contains indispensable information
about how the hotelier’s account functions,
and what its limitations are.
|
|
|
|
| 2.
MANAGING YOUR RESAVENUE ACCOUNT |
| 2.1
LOGGING IN TO YOUR RESAVENUE ACCOUNT |
|
You can access the ResAvenue
system, by clicking on the link/address provided
to you in your ResAvenue account activation email.
Alternately you may log in to your ResAvenue Account
from the login page provided at the ResAvenue
website (http://www.ResAvenue.com). When you log
into your ResAvenue account using the client id
and password provided to you in your activation
email, you will be logged in as the Hotel Super
Administrator with all rights and privileges.
As the Super Administrator you can create additional
users and assign different passwords, with different
access levels, to each member of your staff authorized
to access the ResAvenue property management interface
– (for details on how to assign users and
privileges please refer section 2.3.1).The client
id or username assigned to you, as the Hotel Super
Administrator cannot be changed; however to ensure
the security of your account we recommend that
you change your password for this account regularly.
|
|
|
| 2.2
NAVIGATING THROUGH YOUR RESAVENUE ACCOUNT |
Upon logging in to your account
you will be taken to the main menu. Here you will
find a number of features provided for your convenience:
The Login Information Box
The Navigation Bar
The Main Menu

|
|
|
|
2.3 SETTING UP YOUR RESAVENUE ACCOUNT |
The ResAvenue account has been configured using
information provided by you at the time of registration.
You will be provided with an administrative
interface through a "link" (special
website address) on the ResAvenue website to
complete the set up for your property.
You would need to gather certain information,
which you will need to enter into the ResAvenue
System so that you can quickly enter the information
during your initial Set Up:
-
Your property’s address,
telephone, fax, email etc.
-
Your property’s
brochure or fact sheet, so that you have descriptions
ready to enter into the Property description
page
-
Your cancellation and no
show policy
-
A brief description of
each of your room types (this is the description
which guests will read on-screen when they
select their preferred room type)
-
Rates for each room (or
rate) type, which you wish to feature on the
system (++ or net, as you prefer)
-
Rates for any special
packages which you wish to feature on the
system
-
Allocations for each room
type, which you have entered into the system
(for example: 5 room allocation for superior
rooms)
IMPORTANT: You
are able to amend and update any details entered
into the system 24 hours a day
To set up your ResAvenue M.A.R.S account, please
follow the steps below:
| 2.3.1
User Configuration |
As the System administrator you can
create users in this section and assign
access and function rights and privileges
here. Please note that this screen will
only be accessible to the System Administrator
of your Property (anyone with Hotel
Administrator access level) or any user
to whom the rights for User Configuration
have been specifically assigned.
| You
may create new users,
edit existing users
access rights and also
delete users form this
interface. |
|
|
 |
For the super administrator
you may change the password and name however
please ensure that you do not change any
of the other access rights.The super administrator
or authorised user can create new users
and assign specific rights and privileges
to them. You will need to add the user’s
information and assign separate User Names
and Passwords for each of the Reservations
and Administrative Staff (it's best for
each staff to have a different password)
-
Click on the arrow
of the drop down box Configuration
(at top right of the screen)
-
Select ‘User
Security Settings’ and click
‘Go’ to get to the User
Access Screen.
-
Click on ‘Edit
User’ button to display the
security levels auto-assigned to the
'Hotel Administrator'. Add your name
full name at the top of the screen.
Do NOT change any of the settings
for the Hotel Administrator
-
Click ‘Save’
button to save changes and return
to User Access screen
-
To add users click
on ‘New User’ button and
add Full Name, User Name, and Password
for your staff. Then set the Read/Write,
Read Only, Available access as suited
to that staff member. You can also
set property specific rights.
-
Click ‘Add
User’ button to save and return
to the User Access screen
- Repeat the above steps until you
have added User Name/Password, with
appropriate access levels, for all authorised
staff members.

|
| TOP |
| 2.3.2
Group Configuration |
If you are registered as a Group then,
the Super administrator of the group
will be displayed a special interface,
with an additional menu bar at the top
of the page. This additional menu bar
allows you to configure additional properties
within the group. If you wish to add
more properties to your group you may
do so by entering the details under
the ‘Add New Property’ link
and sending a mail to the administrator
to enable additional properties.The
super administrator of the group or
the user who has been specifically assigned
the Group configuration right you will
also be able to define the default settings
that will be applicable across all properties
within the group. In case of a Group
an additional item ‘Group Configuration’
also appears in the pull-down menu of
functions provided an the extreme right
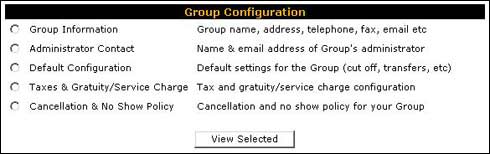
hand side of the menu. The Group Configuration
Menu allows the authorised administrator
to change the group’s details,
group administrator’s contact
information as well as set defaults
settings that will be applicable to
all the properties of the Group.
 |
|
You
may select the details
you wish to view and
click on the ‘View
Selected’ button
placed at the bottom
of the page.
|
|
|
| TOP |
| 2.3.2.1
Group Information |
The Group Information page
comes pre-populated with information
about the group’s headquarters
as provided by you at the time
of registration. You may edit
details as and when required,
to ensure that updated information
is always displayed to your
customers.
|
The
Group’s
Information
and headquarters
details can
be viewed
and edited
from this
interface.
The
administrator
will not be
able to edit
certain details
like the number
of properties
within the
group, the
type and status
of the account,
the location
of the properties
etc
|
|
|
 |
|
| TOP |
| 2.3.2.2
Group Administrative Contact Information |
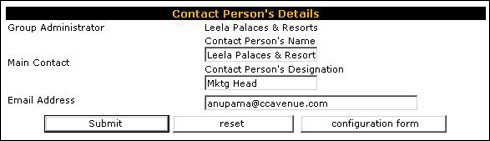
he Group Administrative Contact
Information page comes pre-populated
with information about the group’s
administrative contact as provided
by you at the time of registration.
You may edit details as and
when required, to ensure that
updated information is always
displayed to your customers.
|
| TOP |
| 2.3.2.3
Default Configuration for the Group |
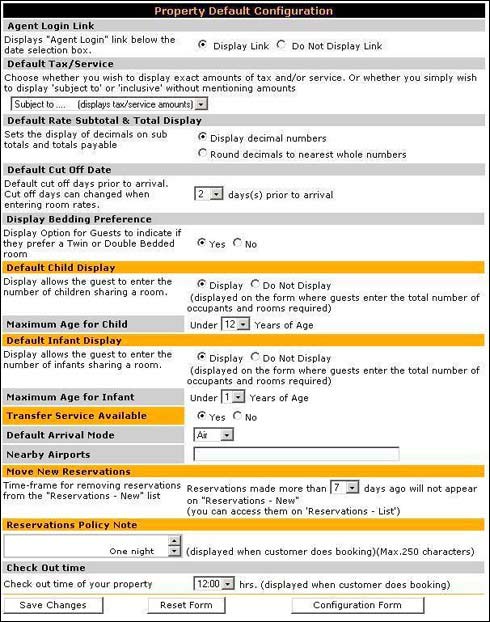
The Default settings interface
allows the super administrator
to set the defaults for the
entire group..
|
|
|
The
Group’s
Default Configuration
screen allows
the super
administrator
to select
and set critical
options and
rules on which
the room and
reservation
information
for all properties
in the group
will be entered
into the system
as well as
displayed
to the customer
at the time
of bookings.
The
administrator
can set and
control such
vital criteria
such as:
- Cut-off
dates.
- Whether
rates
are inclusive
of tax
or subject
to tax.
-
Whether
to offer
twin or
double
bed option
to guests.
-
Whether
or not
infants
and children
can be
entered
in separately
as occupants
and the
max age
limit
for infants
and children.
- Whether
transfers
are available
and the
mode of
transfer
and details
on nearest
airports.
-
The checkout
time is
also configurable
and will
be displayed
to the
guest
at the
time of
booking.
-
You can
also enter
your reservation
policy
here,
which
will be
displayed,
to the
customer
at the
time of
booking.
|
|
|
|
| TOP |
| 2.3.2.4
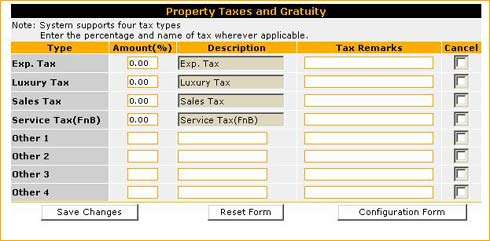
Taxes and Gratuity Configuration |
In this screen you can enter
the tax and service rates applicable
for your property.
- Enter Exp. Tax in the first
line. You should enter the
% value and then enter any
remarks relevant to that tax.
- Enter Luxury Tax in the
second line. You should enter
the % value and then enter
any remarks relevant to that
tax.
- Enter Sales Tax in the
third line. You should enter
the % value and then enter
any remarks relevant to that
tax.
- Enter Service Tax in the
fourth line. You should enter
the % value and then enter
any remarks relevant to that
tax.
- Enter any other Taxes,
surcharges or Service charges
in the fifth line onwards
(or leave them blank)
- If any of the taxes are
not applicable anymore simply
select the Cancel checkbox
provided alongside each to
disable them.
- Click on the ‘Save
Changes’ button to update
your tax settings.
- You have already chosen
whether to display these amounts
(see Property Default Setting
Configuration, Default Tax/Service).
These tax & service %
amounts will only display
if you have chosen to display
them in the Property Defaults
settings above.
|
| TOP |
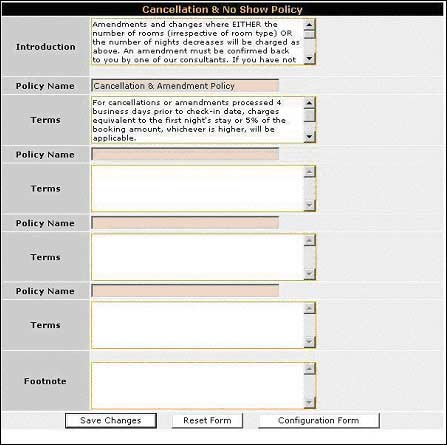
| 2.3.2.5
Cancellation and No Show Policy |
You can create your Cancellation
& No Show Policy from this
interface. Simply follow the
steps below:
- Select “Property
Configuration” from
the right most drop down menu
and click Go
- Click on the radio button
for Cancellation & No
Show and then click the “View
Selected” button
- You need to enter your
property specific “Cancellation
& No Show Policy”
(e.g. the Terms and Conditions
under which you are accepting
guest reservations). Note:
When guests enter their credit
card details to guarantee
their reservation, they will
be invited to click on Cancellation
& No Show Policy - the
information you enter here
is what guests will view.
- You can add a Introductory
note as well as a footnote
in addition to 4 distinct
policy headings and terms.
- Click on “Save Changes”
button to create policies
suited to your property.
- Click Save Changes, then
Click Update Completed OK
|
| TOP |
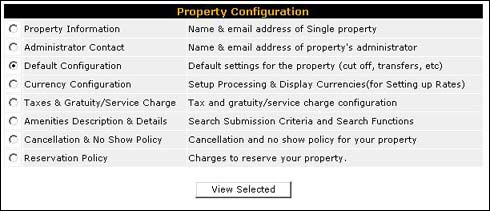
| 2.3.3
Property Configuration |
The Property Configuration
interface allows the Hotel Administrator
to manage the property’s
information and configure the
settings applicable for that
property.
|
You
may select
the details
you wish to
view and click
on the ‘View
Selected’
button placed
at the bottom
of the page.
.
|
|
|
 |
| 2.3.3.1
Property Information |
The property information
screen is pre-populated
with information obtained
at the time of registration
with ResAvenue. In case
of multiple properties,
the data for each property
must be entered separately.
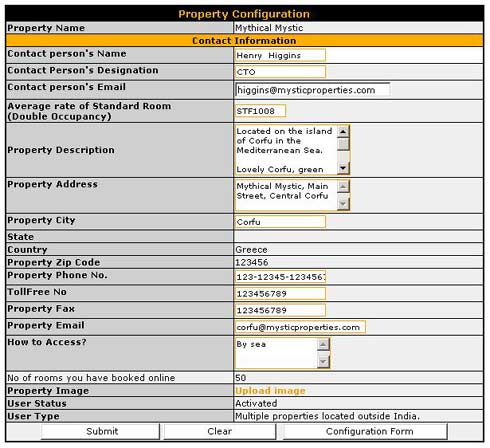 |
The
Property’s
Information
and
address
details
can
be
viewed
and
edited
from
this
screen.
The
administrator
cannot
edit
certain
details
like
the
type
of
account
and
status
of
the
account,
number
of
rooms
to
be
made
available
for
booking
online.
|
|
|
|
| TOP |
| 2.3.3.2
Property Administrator Contact
Details |
The administrator who
has been assigned Property
configuration rights
can also change the
contact name, designation
and email address.

|
| TOP |
| 2.3.3.3
Default Configuration for
the Property |
The Default settings
interface allows the
administrator to set
the defaults for the
property. The administrator
may override the defaults
set by the Group administrator.
The
Property’s
Default
Configuration
screen
allows
the
administrator
to
select
and
set
critical
options
and
rules
on
which
the
room
and
reservation
information
for
this
particular
property
will
be
entered
into
the
system
as
well
as
displayed
to
the
customer
at
the
time
of
bookings.
The
administrator
can
set
and
control
such
vital
criteria
such
as:
-
Cut-off
dates.
-
Whether
rates
are
inclusive
of
tax
or
subject
to
tax.
-
Whether
to
offer
twin
or
double
bed
option
to
guests.
-
Whether
or
not
infants
and
children
can
be
entered
in
separately
as
occupants
and
the
max
age
limit
for
infants
and
children.
-
Whether
transfers
are
available
and
the
mode
of
transfer
and
details
on
nearest
airports.
-
The
checkout
time
is
also
configurable
and
will
be
displayed
to
the
guest
at
the
time
of
booking.
-
You
can
also
enter
your
reservation
policy
here,
which
will
be
displayed,
to
the
customer
at
the
time
of
booking.
|
|
|
|
|
| TOP |
| 2.3.3.4
Currency configuration |
For
each property you will
have at the time of
registration selected
the currencies in which
you will be processing
your online bookings.
In the currency configuration
screen you can select
or change your primary
processing currency
from any of the processing
currencies you have
selected at the time
of registration. You
can select a currency
to display a separate
rate structure for local
residents. You can select
to display resident
currency rates to non-residents
or to display non-resident
currency rates to your
resident customers.
-
To configure you
currencies click
on the ‘Property
Configuration’
in the right hand
side menu.
-
Select your primary
processing currency
-
Select the currency
in which you wish
to display rates
to local residents
-
And choose whether
or not resident
currency rates are
to be shown to non-residents
and vice versa.
-
Select the currencies
in which you wish
to display rates
on your website
-
Click on the ‘Submit’
button to save your
settings.
- Please note that
after saving these
settings you must
click on the ‘Conversion
Rates’
and enter the rates
for each display currency
(and/or resident currency)
vis-à-vis the
primary processing
currency selected
by you.
Please
note that if ever you
change the primary processing
currency then the exchange
rates you have entered
for the display currencies
will be wiped out and
you will have to re-enter
the exchange rate for
each of the currencies
in view of the new primary
processing currency.


|
| TOP |
| 2.3.3.5
Taxes and Gratuity Configuration |
In
this screen you can
enter the tax and
service rates applicable
for your property.
-
Enter
Exp. Tax in the
first line. You
should enter the
% value and then
enter any remarks
relevant to that
tax.
-
Enter Luxury Tax
in the second
line. You should
enter the % value
and then enter
any remarks relevant
to that tax.
-
Enter Sales Tax
in the third line.
You should enter
the % value and
then enter any
remarks relevant
to that tax
-
Enter Service
Tax in the fourth
line. You should
enter the % value
and then enter
any remarks relevant
to that tax.
-
Enter any other
Taxes, surcharges
or Service charges
in the fifth line
onwards (or leave
them blank)
-
If any of the
taxes are not
applicable anymore
simply select
the Cancel checkbox
provided alongside
each to disable
them.
-
Click on the ‘Save
Changes’
button to update
your tax settings.
-
You have already
chosen whether
to display these
amounts (see Property
Default Setting
Configuration,
Default Tax/Service).
These tax &
service % amounts
will only display
if you have chosen
to display them
in the Property
Defaults settings
above.
|
| TOP |
| 2.3.3.6
Cancellation and No Show
Policy |
You
can create your
Cancellation &
No Show Policy from
this interface.
Simply follow the
steps below:
- Select “Property
Configuration”
from the right
most drop down
menu and click
Go
- Click on
the radio button
for Cancellation
& No Show
and then click
the “View
Selected”
button.
- You need
to enter your
property specific
“Cancellation
& No Show
Policy”
(e.g. the Terms
and Conditions
under which
you are accepting
guest reservations).
Note: When guests
enter their
credit card
details to guarantee
their reservation,
they will be
invited to click
on Cancellation
& No Show
Policy - the
information
you enter here
is what guests
will view.
- You can add
a Introductory
note as well
as a footnote
in addition
to 4 distinct
policy headings
and terms.
- Click on
“Save
Changes”
button to create
policies suited
to your property.
- Click Save
Changes, then
Click Update
Completed OK
|
| TOP |
|
|
|
|
| 3.
CONFIGURE ROOM TYPES |
The ResAvenue Transaction Gateway
offers e-hoteliers’ in India a one-stop solution
for processing e-transactions ranging from credit card
transactions to direct debit from their online bank
accounts. At ResAvenue we strive to offer value added
services to the e-merchant to increase the number of
transactions, their value and overall profitability
and to enhance transaction security and pro-actively
counter fraud and charge-back related losses.
The Current room types page shows you the details of
all room types currently entered into the system. The
first time you visit this screen however you will find
the message ‘ No Room Types have been currently
configured’.
To add a new Room Type, click on ‘New Room Type’
button provided at the bottom of the ‘Current
Room Types’ display page and follow instructions
given under the section “ Configure A New
Room Type” until you have finished entering
all your room types.
Once you have configured your room types you will be
displayed the details of the currently configured Room
Types with their description, occupancy details and
internal notes if any. With a link to “ View
Room Image”, “ Edit Room
Details” and “ Delete Room”
alongside.

|
|
|
| 3.1
Add A New Room Type |
-
Click on the arrow of the
drop down box (at top right of the screen) and
select the “Room Type Configuration”
option and click on “Go”
-
Each room type must be entered
individually (we suggest that you start with your
"lowest" grade room and then move up
to your best suites). Please enter all room types,
which you wish to feature on Internet Room Code
- for example, SUP or DLX.
-
Room Type – Here you
may enter the name of the room for example, Superior
Room City View, Superior Room River View, etc
-
Room Classification - select
the classification of the room form the dropdown
provided. For example room, suite, villa, etc
– as appropriate
-
Room Description – Enter
the description of the room here. Ensure that
this is as descriptive as possible as this is
the only description, which guests will see during
the reservation process. Mention, for example,
air-conditioning, en suite bathroom with separate
shower unit, in-room safety deposit box, coffee
and tea making facilities, room size in sq m,
in-room fax, modem jack, cable TV, in-house movies,
etc. (Note that the "space" limit is
250 characters!). Since potential guests view
the Room Descriptions, we suggest that you print
a copy of the descriptions you have entered and
pass it to your Director of Sales so that he/she
is aware of what guests will read on-screen.
-
Maximum Rooms available –
Here you need to specify the number of rooms of
this type, you intend to make available for booking
online.
-
Maximum Room Occupancy –
Please enter the maximum number of adults you
will accept in this room type in existing beds
·
-
Maximum Additional Adults
– Please enter the maximum number of additional
adults you will accept in this room type in extra
beds
-
Maximum Children – enter
the maximum number of children you will accept
in this room type, sharing with one or more adults
in existing beds. Note: Guests making a reservation
will see a note stating, for example, maximum
2 adults per room in existing beds + 1 extra adult
OR 1 child under 12 years old
-
Room Amenities – select
the amenities provided for this specific room
type by checking the options below.
-
After entering the above details
click on the “Submit” button to add
the new Room Type.

|
|
|
| 3.2
How do I allocate rooms and set rates? |
-
Click on the arrow of the
drop down box (at top right of the screen) and
select the “Room Type Configuration”
option and click on “Go”
-
Each room type must be entered
individually (we suggest that you start with your
"lowest" grade room and then move up
to your best suites). Please enter all room types,
which you wish to feature on Internet Room Code
- for example, SUP or DLX.
-
Room Type – Here you
may enter the name of the room for example, Superior
Room City View, Superior Room River View, etc
-
Room Classification - select
the classification of the room form the dropdown
provided. For example room, suite, villa, etc
– as appropriate
-
Room Description – Enter
the description of the room here. Ensure that
this is as descriptive as possible as this is
the only description, which guests will see during
the reservation process. Mention, for example,
air-conditioning, en suite bathroom with separate
shower unit, in-room safety deposit box, coffee
and tea making facilities, room size in sq m,
in-room fax, modem jack, cable TV, in-house movies,
etc. (Note that the "space" limit is
250 characters!). Since potential guests view
the Room Descriptions, we suggest that you print
a copy of the descriptions you have entered and
pass it to your Director of Sales so that he/she
is aware of what guests will read on-screen.
-
Maximum Rooms available –
Here you need to specify the number of rooms of
this type, you intend to make available for booking
online.
-
Maximum Room Occupancy –
Please enter the maximum number of adults you
will accept in this room type in existing beds
·
-
Maximum Additional Adults
– Please enter the maximum number of additional
adults you will accept in this room type in extra
beds
-
Maximum Children – enter
the maximum number of children you will accept
in this room type, sharing with one or more adults
in existing beds. Note: Guests making a reservation
will see a note stating, for example, maximum
2 adults per room in existing beds + 1 extra adult
OR 1 child under 12 years old
-
Room Amenities – select
the amenities provided for this specific room
type by checking the options below.
-
After entering the above details
click on the “Submit” button to add
the new Room Type.
|
|
|
| 4.
CONFIGURING RATE MASTERS |
The Rate Master page shows you the
details of all Rate Masters currently entered into the
system. The first time you visit this screen however
you will find the message ‘ No Rate Masters have
been currently configured’.
To add a new Rate Master, click on ‘Add New Master’
button provided at the bottom of the ‘Rate Master’
display page and follow instructions given under the
section “ Add A New Rate Master”.
Once you have configured your Rate Master you will be
displayed the details of the currently configured Rate
Master with the Rate Master name, related Rate Master
code and associated Rate codes and the number of agents
sharing the Rate Master.
The booking acceptance status of each Rate Code under
a rate master will also be displayed. You can set the
status to ‘NO’ to immediately stop accepting
booking for this rate code by clicking on the name of
the Rate code to be modified and setting the ‘Code
Open to Accept Bookings’ field to ‘No’
and saving.
To add a new rate code under a specific Rate Master
simply click on the ‘ Add A New Rate Code’
link provided under that specific Rate Master. You will
also be able to view the Rate Summary for each Rate
Master by clicking on the ‘ Rate Summary’
link provided below the specific Rate Master

|
|
|
| 4.1
Adding a New Rate Master |
-
Click on the arrow of the
drop down box (at top centre of the screen) and
select the “Rate Master” option and
click on “Go”
-
Click on the “Add A
New Master” button provided at the bottom
of the page.
-
Enter a Rate Master code and
Rate Master Name, as well as a description, which
is for internal use only.
-
You can opt to rate codes
automatically for each room type.
-
After saving you will be displayed
the Rate Master. If you have chosen to add all
room types to the new rate master then the system
will automatically assign rate codes for each
of the room types and display them below the Rate
Master name.

|
|
|
| 4.2
Add A New Rate Code |
To add a new Room Code, click on
‘Add New Rate Code’ button
provided at the bottom of the ‘Rate
Master’ display page and follow instructions
given below.
-
Enter a Rate Code Name and
Rate Code, as well as a description which is for
internal use only.
-
You can set whether this code
is open to accept bookings.
-
You can set the Room type
for the Rate code.
-
Select a classification of
the Rate from the drop down menu.
-
Enter the Rate Inclusions
i.e. a description of what services and facilities
are included in for this rate code.
-
You can also specify internal
notes for the information of your in-house staff
only.
-
Click on the ‘Save
Rate Code’
|
|
|
| 4.3
Adding Rates |
-
Click on the arrow of the
drop down box (at centre of the screen) and select
the “Rates -New” option and click
on “Go”
-
Select the Rate Master for
which you wish to add the rates.
-
Select the Rate code within
that Rate Master.
-
Now select the dates from
and till you wish to have the rates applied.
-
Select the currency in which
you wish to enter the rates. You must enter rates
for all your processing currencies to ensure that
the rates will be displayed on your website.
-
Now hit the ‘Enter Rates’
button.

You will now be displayed a screen to set
the rate conditions and rates per room.
-
You need to set the Minimum
and Maximum nights that a customer can stay.
-
You must set the cut-off period
before the arrival date after which you will not
accept bookings online.
-
You must select whether to
enter rates on a per person basis or on a flat
rate per room basis.
-
Rates also must be entered
for both residents as well as non-residents.
-
Now click on the ‘ Save
Rates’ button at the bottom of
the page.

|
|
|
| 5.
CONFIGURING ALLOCATION MASTERS |
The Allocation Master page shows
you the details of all Allocation Masters currently
entered into the system. The first time you visit this
screen however you will find the message ‘ No
Allocation Masters have been currently configured’.
To add a new Allocation Master, click on ‘Add
New Master’ button provided at the bottom of the
‘Allocation Master’ display page and follow
instructions given under the section “ Add
A New Allocation Master”. Once you have
configured your Allocation Master you will be displayed
the details of the currently configured Allocation Masters
with the Allocation Master name, related Allocation
Master code and associated Room types and the number
of agents sharing the Allocation Master.
You can activate auto alerts for each room type under
the Allocation Master so that you will be informed when
the room inventory drops below the assigned value.

|
|
|
| 5.1
Adding a New Allocation Master |
To add a new Allocation Master
you must enter the code and name for the master
as well as a description in the fields provided.
Upon clicking on the ‘ Create New’
button the Allocation Master is created and
all room types are automatically assigned to
it. Simply click on the ‘ Back
to Allocation Masters’ link to
exit out of the creation of a New Allocation
Master and return to the previous screen.
|
|
|
|
| 5.2
Allocating Rooms to a New Allocation Master |
To allocate rooms to an Allocation
Master you must follow the steps outlined below:
-
Select the Allocation
master to which you will be allocating rooms
from the dropdown provided
-
Select the room type
of the rooms you wish to add to this allocation.
-
Select the date from
and until when you wish to allocate the
rooms. Please note that the allocations
will be effective only until the night of
the date selected.
-
Now enter the number
of rooms of the selected room type you wish
to allocate for the specified period and
for the specified allocation master. You
can either choose to assign different number
of rooms for each day of the week in the
boxes provided OR you may choose to assign
the same number of rooms for all the days
within the specified period by simply entering
the number in the Global text field.

|
|
|
|
|
| 5.3
Amend an Allocation |
To amend an Allocation, the
steps are as outlined below:
-
Select the Allocation
master to which you will be allocating rooms
from the dropdown provided
-
Select the month and
year for which you wish to make amendments.
-
Then Select the room
type and click on the ‘View &
Update’ button.

You will be displayed the room allocation
for the selected Allocation Master and for
the selected display month. You can amend
the allocation in any of the following ways:
-
You can simply change
the number of rooms allocated for any of
the dates displayed.
-
You can also opt to
make certain dates ‘Request Only’,
implying that these rooms will not available
for real time booking for these dates but
instead an email request will be sent to
your hotel reservations staff. Simply check
the ‘Request Only’ check box
provided below the date.
-
You can also instantaneously
block dates as sold out by checking the
‘Sold Out’ check box provided
below the date.When you have made all the
changes in allocations for the specified
period you can update the Allocation Master
by clicking on the ‘Save Changes’
button provided below.

|
|
|
|
|
| 5.4
View Allocations |
To view Allocations follow
the steps outlined below:
- Select the Allocation master for which you
wish to view allocations from the dropdown provided.
- Select the month and year.
- You can either view allocations for all room
types or select a specific room type.
- Select the period for which you wish to view
allocations. By default a view of one month
is pre-selected.
- Click on the ‘Quick View’ button
or if you simply want to see a summary for a
specific period click on the ‘Summary’
button.
The Quick view will display the number of rooms
allocated for each room type over the period
selected.

The summary will display a consolidated view
of number of rooms available, on request and
closed out for the period selected, for each
allocation master.

|
|
|
|
| 6.
AGENT CONFIGURATION |
The ‘Agent Configuration’
in the ‘Configuration’
drop down menu will take you to the ‘Agent Summary’
screen which displays the Agent code, Agent name and
the status of the agent (whether active or not). The
first time you visit this page you will be displayed
the message ‘No Agents Configured’.
To add a new Agent, click on ‘New Agent’
button provided at the bottom of the ‘Agent
Summary’ display page and follow instructions
given under the section ‘Adding A New
Agent’. Once you have configured your
Agent the details of the currently configured Agents
with the Agent name, related Agent code and the status
of the agent, i.e. whether active or not will be displayed
on this page.
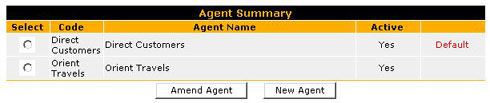
To edit an agent simply select the radio button provided
alongside the Agent you wish to edit and click on
the ‘Amend Agent’ button at the bottom.
|
|
|
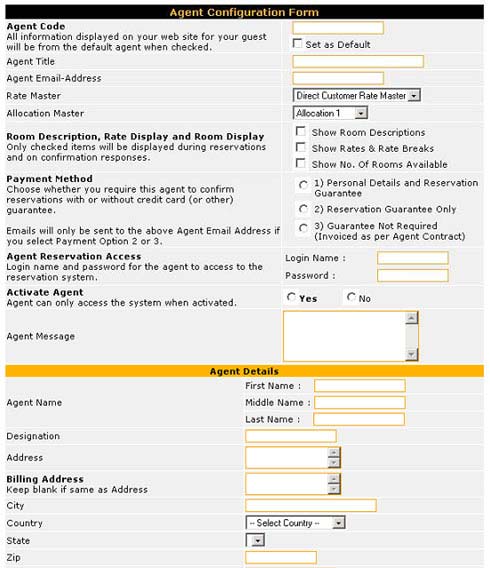
| 6.1
Adding a New Agent |
To add a new Agent you must enter
the code for the Agent and set whether the agent is
a default agent. If you set the agent as the default
agent then the rates and allocations assigned for
this agent will be displayed to the guests visiting
your website for reservations. The other information
as requested on the form must be entered for agent.
 |
|
The
Agent Configuration screen allows
the administrator to create a
new agent and assign the Rate
Master and Allocation Master for
the agent.
He
can set whether the agent is to
be displayed room descriptions,
rates and / or number of rooms
available.
The
administrator can set payment
method allowed for the agent,
for example:
-
Personal Details and Reservation
Guarantee
-
Reservation Guarantee Only
-
Guarantee Not Required (Invoiced
as per Agent Contract)
The
agent must be assigned a dedicated
username and password using which
he may log in to view availability
and make bookings.
The
administrator has the ability
to activate and de-activate the
agent at any time.
Clicking
on the ‘Add Agent’
button will save the new agent
details.
|
|
|
|
|
|
| 7.
CONFIGURING PACKAGES |
| 7.1
Adding A Package |
To configure rates for special
packages you need to create a new Rate code for each
of your packages by following the steps listed below:
-
Step 1: Click
on the arrow of the drop down box (at top centre
of the screen) and select the “Rate Master”
option and click on “Go”
-
Step 2: To
add a new Room Code, click on ‘Add
New Rate Code’ button provided
at the under the Rate Master under which you wish
to create the package and follow instructions
given below.
-
Step 3: Enter
a Rate Code Name and Rate Code, as well as a description,
which is for internal use only.
-
Step 4: You
can set whether this code is open to accept bookings.
-
Step 5: You
can set the Room type for the Rate code.
-
Step 6: Select
‘Package Rate’ as the Rate
classification of the Rate from the drop down
menu. This is very important if you do not select
‘Package Rate’ then
your Rate code will not show as a package.
-
Step 7: Enter
the Inclusions for the package i.e. a description
of what services and facilities are included in
for this particular package.
-
Step 8: You
can also specify internal notes for the information
of your in-house staff only.
-
Step 9: Click
on the ‘Save Rate Code’
|
|
|
| 8.
REPORTS |
The ResAvenue M.A.R.S. interface
provides you with reporting features to retrieve detailed
statistical reports and information based on the criteria
you specify. For example:
Guest Records
Reservation – List
Revenue Report
Reservations – New
Reservation – Search
Traffic report
|
|
|
| 8.1
Guest Records |
This interface allows you to retrieve information
based on your guest’s information like name,
city name, country, email address etc.

Your search will display guest details, which match
the selected criteria. If a guest has made multiple
bookings using the ResAvenue system then you will
see the guests information displayed multiple times.
Clicking on the ‘Details’ link alongside
each will provide the information.

|
|
|
| 8.2
Reservation – List |
You can choose to view the list of reservations
made through the ResAvenue booking system. The reservation
list can be sorted based on Agent name, Arrival
month and Booking status of the reservation. You
may select one or all conditions to filter your
search. Select 'Reservations List' from the drop
down list on the top left-hand side of the Control
Center. Choose the month/year you wish to view and
click 'Show Guest List'.

|
|
|
| 8.3
Revenue Report |
This screen gives you a monthly
summary of Room Nights Booked and Total Revenue. Your
Reservations Manager can print it out on a monthly
basis.

This report features:
-
A summary of reservations made
in 1 month, for each rate type entered into the
system.
-
The report heading are: Number
of Reservations, Total Rooms Booked, Total Room
Nights, Total Revenue for Month, Average Length
of Stay and Average Room Rate.
Note: This report is only accurate
if your Reservations Manager keeps reservation
details up-to-date in the Control Center.

|
|
|
| 8.4
Reservation – New |
This screen gives you a monthly
summary of Room Nights Booked and Total Revenue. Your
Reservations Manager can print it out on a monthly
basis.

This screen shows you how many times availability
has been checked at your hotel in a specified month.
Your Reservations Manager can print it out on a monthly
basis. This report includes:
-
A summary of Availability Checks.
-
The total number of Reservations
Submitted.
-
The date that Availability
was checked from your website.
-
The reservation dates that
the Guest requested.
-
Advice on whether room showed
Available or Not Available on the ResAvenue System
(e.g. whether or not your hotel has entered a
room allocation into the System)
-
The IP Host address which
enables you to keep track of the IP from where
your guests are making bookings.
Note: If the number of times rooms show 'Not Available'
is high, you are either running with high occupancy
over certain dates or you do not have sufficient room
allocations entered in the System.
|
|
|
| 8.5
Reservation – Search |

This screen shows you how many times availability
has been checked at your hotel in a specified month.
Your Reservations Manager can print it out on a monthly
basis. This report includes:
- A summary of Availability Checks.
- The total number of Reservations Submitted.
- The date that Availability was checked from your
website.
- The reservation dates that the Guest requested.
- Advice on whether room showed Available or Not
Available on the ResAvenue System (e.g. whether or
not your hotel has entered a room allocation into
the System)
- The IP Host address which enables you to keep track
of the IP from where your guests are making bookings.
Note: If the number of times rooms
show 'Not Available' is high, you are either running
with high occupancy over certain dates or you do not
have sufficient room allocations entered in the System.
|
|
|
| 8.6
Traffic Report |

Please note that this screen shows you how many times
availability has been checked at your hotel, the total
number of reservations submitted and, where available,
it indicates the country of origin of the availability
check:Click on the arrow of the drop down box Reservations
(at top left of the screen)Select Traffic Report and
click GoChoose the month which you want to check (this
obviously should be prior to today's date)
|
|
|
| 9.
CUSTOMISATION OF YOUR BOOKING PAGES |
| 9.1
Customisation of the look and feel of the booking page |
Customisation enables you to change
and match the look and feel of the ResAvenue booking
engine page with that of your hotel website. To customise
your booking page follow the steps below:
- Select “Property Configuration” from
the right most drop down menu and click Go
- Click on the radio button for Customisation and
then click the “View Selected” button.
- You can upload your property’s or group’s
banner.
- You can select and set the colour of the background,
the font colour size and style for each of the elements
separately.
- Click “Preview Settings” to get a view
of the way the page will look with your font and colour
selections.
- Click on “Save Settings” button to
update the changes.

|
|
|
| 9.2
Customisation of Links |
You can add links at the top of
your booking engine pages to provide a navigational
menu for your guest. Simply add the name or title
of the link as you would like it to appear on your
booking pages and the associated url and click on
the “Save Link Setting” to save the same.

|
|
|
| 10.
ADVANCE ADMINISTRATION |
The Advance Administration menu
will be available on the extreme right only for the
designated Super Admin. The modules under the advance
administration provide the administrator with additional
functionality like:
Account Summary
Advance Configuration
Transaction Summary
|
| 10.1
Account Summary |
The Account Summary provides the
administrator with a listing of unsettled the transactions
for the past two weeks in your selected primary processing
currency.
|
|
|
| 10.2
Advance Configuration |
|
|
|
|
| 10.3
Transaction Summary |
The Transaction Summary provides
the administrator with a listing of the unsettled
transactions for the past two weeks in your selected
primary processing currency. If you wish to search
for transactions for a specific period, simply select
the date from and to date of the time period desired
and the currency for which you wish to see the listing.

You will note that the table displays the order
number, the date the transaction was captured,
the status of the transaction, the amount either
credited or debited for the transaction and the
balance. If the number of records exceeds 20 then
these will be displayed in subsequent pages. Each
page will display the total balance for the records
displayed on that page. The total balance for
all the transactions on this page are computed
and displayed at the bottom of the table. Clicking
on the order number pops up a window displaying
the details of that particular order.

|
|
|
|
|
|
|


